
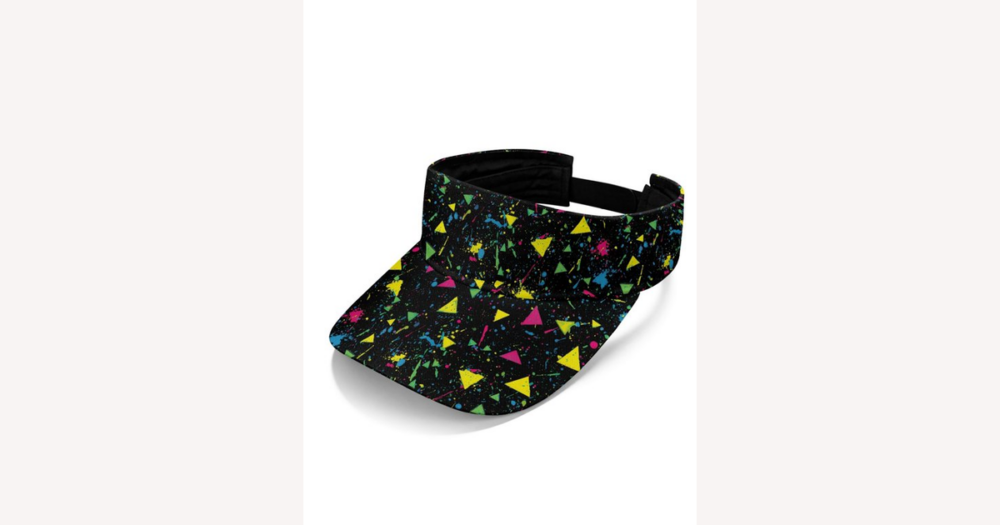
To pick an 80s-style vintage visor on DHgate, you need to read the listing like a style checklist: focus on wide or chunky silhouettes, neon or primary color blocks, clear or tinted plastic brims, and bold front logos or text, then combine those design cues with a quick check of seller history and listing clarity so you’re not gambling on a flimsy, off-style visor.
What actually makes a visor look ‘retro 80s’?
On DHgate, an 80s-style visor is all about how it looks at first glance: the silhouette, the color, and the materials need to echo that era more than today’s sleek athleisure gear. The most instantly retro shapes are clear plastic sun visors that sit fairly high and wide on the head, foam-front golf visors with a slightly puffy panel across the forehead, and sporty profiles with a chunky band rather than a thin, minimal strap. When you scroll listing photos, I’d focus first on whether the visor looks broad and a bit bold around the front instead of streamlined and ultra-curved like a modern running visor.
Color and surface finish do a lot of the work. Strong neon shades (lime, hot pink, electric blue), saturated primaries (red, royal blue, yellow), and high-contrast pairings like white bands with bright brims feel very 80s. Clear or tinted plastic brims—especially in translucent greens, blues, or pinks—are another giveaway, as are semi-gloss plastics that look like pool inflatables or old cassette cases rather than ultra-matte performance fabric. In DHgate photos and descriptions, I’d look for words like “neon,” “fluorescent,” “clear,” “transparent,” or “tinted” in combination with close-up pictures that clearly show a see-through brim or a very bold color block.
Logos and text also matter. Many retro visors put a strong wordmark or graphic right across the front panel, often in capital letters or simple block fonts, sometimes with a simple graphic like a wave or line. Printed or flocked text that spans most of the foam panel, or a bold emblem centered on a wide band, usually reads more retro than a tiny modern swoosh in the corner. These traits are style signals, not strict rules: a visor doesn’t have to tick every box to feel 80s. If it has a wide or chunky silhouette, a neon or primary color pop, and a bold front graphic or clear brim, it will probably look convincingly retro in photos. On DHgate I would skip visors that lean heavily into subtle, all-black, or ultra-technical running styles, even if they’re cheap, because they tend to read as generic athleisure instead of the playful 80s look most buyers want.
How materials and construction change the feel of an 80s-style visor
Once you’ve found a visor that looks 80s, the next question is how its materials and construction will actually feel. Clear or tinted plastic brims are classic, but thin plastic can be very stiff, prone to scratches and stress lines, and may dig into your forehead; thicker plastic with a smooth, even edge usually feels more solid. Fabric brims—often cotton or polyester—tend to be softer and more forgiving, with better breathability, but they can look less obviously retro unless the colors and logos are strong. Foam-front panels give that lightweight, slightly puffy golf-visor look many people remember; they compress easily and can dent if crushed, while more structured cotton or polyester crowns hold their shape and feel less flimsy. Mesh backs or side panels can make a visor cooler in hot weather but shift the look toward a sport cap if the mesh dominates.
Closures make a difference to both comfort and longevity. Velcro is easy to adjust and was common on casual 80s headwear, but it can pick up lint and lose grip over time. Plastic snapback-style tabs feel very era-appropriate and usually stay put once set, though they offer fewer micro-adjustments. Small buckle or slide closures tend to feel more secure and polished but can look slightly more modern, depending on how chunky the band is. Even without testing a visor, you can use DHgate-style listings to gauge build quality: check the specs for clear mentions of materials (for example, “PVC brim with foam front,” “cotton visor,” or “polyester mesh”) and any note about thickness or double layers. Zoom in on photos to inspect stitching around the brim and band, looking for straight lines, consistent spacing, and edges that are folded or bound rather than raw. I’d happily pay a bit more for a visor where the plastic looks substantial, the foam sits smoothly, and the stitches are neat; I’d skip listings where the brim looks paper-thin, the plastic visibly waves or warps, or you can already see uneven stitching and loose threads in the photos, even if the style itself nails the 80s look.
Retro-inspired visors vs. cheap costume props
Fashion-grade retro visors are built to be worn more than once, so they usually look a bit sturdier in photos: the plastic or fabric appears thicker and holds its shape, colors look rich rather than washed out, and the surface isn’t mirror-glossy or crinkly. Stitching around the brim and band tends to run in straight, even lines, with edges that are folded or bound rather than left raw, and you don’t see blobs of glue where the pieces join. Closures also feel more deliberate: a Velcro tab that’s neatly sewn on, a snapback strip with multiple positions, or a small buckle that looks firmly attached all suggest a visor designed as a fashion accessory, not a disposable prop.
Costume-grade visors, by contrast, often look flimsy even in a DHgate-style listing photo. The plastic can seem very thin and slightly wavy, with an extremely shiny but flat color that feels more like a party favor than a piece of headwear. Edges may look roughly cut, with tiny nicks or uneven curves, and you might spot visible glue where the brim meets the band. One-size elastic bands that disappear behind the head, with no visible means of adjustment, are another giveaway that the visor is meant for short-term novelty use. Logos and text also tell you a lot: on better visors they’re embroidered, applied as a clean patch, or printed sharply with solid coverage, whereas cheaper props often show off-center, fuzzy prints that already look like they could crack or peel after a few wears. If you want a visor that looks convincingly 80s in photos and survives multiple outings, I’d treat any listing showing those costume cues as a pass, even if the price looks tempting.
- Zoom in on brim and band edges in the photos and check how cleanly they’re finished. Look for smooth, even curves and folded or bound edges; rough cuts, tiny notches, or visible glue lines are strong signs of a costume-grade visor.
- Inspect stitching around the brim, band, and any foam panel. Consistent stitch length and straight lines suggest a more fashion-focused build, while crooked seams, skipped stitches, or loose threads point toward a cheap prop.
- Study how the logo or text is applied. Embroidery, patches with tidy borders, or crisp prints that follow the curve of the band usually indicate better quality; thin, slightly blurry, or off-center prints that sit on top of the material like a sticker often behave like costume graphics.
- Check the closure area specifically. Clear photos of Velcro tabs, multi-position snaps, or buckles with visible hardware signal real adjustability, whereas a plain elastic band with no detail shots often means a one-size party visor that may not fit comfortably.
- Scan the written specs and any buyer-uploaded photos for clues about material thickness and feel. Mentions of “thick PVC,” “double-layer foam,” or “cotton visor” with close-up images are more reassuring than vague phrases like “plastic material” with only a few distant shots; on DHgate, sparse descriptions and low-resolution images usually deserve extra caution.
How to evaluate 80s-style visor listings and sellers on DHgate
- Scan the listing title and tags for 80s-related keywords such as “retro,” “neon,” “clear visor,” or “vintage-style,” but treat them as marketing language. Use them as a hint that the seller is aiming for an 80s look, then check whether the photos and specs actually show a wide, bold silhouette, bright colors, and the right brim style.
- Read the specifications closely for material type, brim style, crown construction, and measurements. Note whether the visor is described as plastic, PU, PVC, cotton, or polyester, how wide the brim is, and any head-circumference figures. When details are very generic—“fashion visor,” “good material,” or no measurements at all—I’d treat that vagueness as a caution sign.
- Open every available photo and zoom in to inspect brim transparency, band width, stitching, seam finishing, logo placement, and closure type. Apply the earlier style and quality criteria: does the brim look thick enough, are edges smooth, and do logos look cleanly applied? Listings that rely on a single low-resolution image or hide key areas like the closure are riskier, no matter how good the style looks from afar.
- Verify sizing and adjustability. Look for head circumference ranges, size charts, or clear shots of Velcro, snaps, or buckles that show how far the band can expand. Avoid listings that never explain how the visor fits different head sizes, especially if you’re buying for events where several people might share it.
- Review seller ratings and history on DHgate before you decide. Check the overall score, how many transactions they’ve completed, how recent the feedback is, and whether buyers say the visor matches the photos and description. Thin or inconsistent feedback—like only a few old reviews or comments about items arriving different from the listing—would make me much more cautious, even if the visor design looks perfect.
DHgate generally routes payments through the platform rather than directly to the seller, and funds are typically released only after you confirm receipt or a set period passes. That structure gives you a window to check the visor once it arrives, compare it with the listing, and raise any issues before the order fully closes. You can usually track shipping status in your DHgate account as the package moves through the seller’s chosen carrier.
If a visor turns up significantly different from its listing—wrong color tone, much thinner than shown, or with a different logo treatment—you can document the problem with clear photos and open a dispute using DHgate’s order tools. The help pages explain the exact steps and timelines, but the core idea is to submit evidence and request a refund or partial refund within the allowed period. Sellers can respond, and DHgate can step in if you can’t agree on a solution.
Those protections work best when you choose sellers carefully in the first place. I’d favor DHgate sellers who list realistic shipping times, give straightforward return or refund terms, and reply promptly to pre-sale questions about materials or sizing. If a listing combines vague specs, low-resolution images, and a seller with sparse or mixed reviews, I’d rather keep scrolling than risk the hassle of a dispute, even if the visor looks like the perfect 80s match at first glance.
Common pitfalls when buying 80s-style visors online
- Treat “vintage” and “retro” on DHgate as style claims, not proof of age. Most listings don’t document manufacturing dates or provenance, so assume the visor is a modern, 80s-inspired piece unless the seller clearly shows evidence that it’s old stock. In that case, you’re mainly buying the look and construction you can see.
- Expect color shifts between edited listing photos and real life, especially with neon and strong primary tones. Be wary of listings that only show studio-style images; whenever possible, read buyer reviews that mention color accuracy and check user-uploaded photos to see how bright or cool the visor actually appears.
- Avoid unclear sizing. If the listing doesn’t give head circumference, size ranges, or show how far a Velcro tab, snapback, or buckle can adjust, treat that as a red flag. On DHgate I’d either message the seller for measurements or skip the visor rather than risk an uncomfortable fit, even if the design looks perfect.
- Factor in seller history before you trust a listing. Sparse or mixed feedback—very few completed sales, old reviews, or comments that items don’t match their descriptions—means higher risk. I’d rather choose a visor from a seller with steady ratings, substantive reviews, and realistic shipping and return terms than gamble on a poorly documented listing that only looks ideal in photos.
Quick checklist for choosing an 80s-style visor anywhere online
- Style authenticity: check that the visor uses neon or strong primary colors, a clear or tinted plastic brim, a foam-front or wide sporty silhouette, and bold logo or text across the band for an instant 80s read.
- Materials and build: confirm brim material (plastic vs. fabric), crown type (foam vs. structured), and look closely at stitching, seam finishing, and closure quality in both specs and photos to avoid flimsy construction.
- Fit and comfort: make sure head circumference or size ranges are listed and that the visor has an adjustable closure you’re confident will fit your head or anyone else who’ll wear it.
- Listing clarity: prefer listings with multiple clear photos, precise material and color descriptions, and explicit logo treatment details instead of generic phrases like “fashion visor” or “high quality.”
- Seller and purchase basics: on DHgate, scan ratings, review volume and detail, and transaction history, then read stated shipping times and dispute/refund terms so you know what protection you have if the visor arrives different from its description.
FAQ: Vintage labels, customization, and order problems
Are visors labeled “vintage” on DHgate usually true 80s pieces or modern reproductions?
On DHgate, “vintage” is usually a style claim, not proof of age. Most visors are modern items designed to look retro because sellers rarely document manufacturing dates or provenance. Unless the listing clearly shows evidence that it’s old stock—such as dated packaging, production information, or a detailed history—it’s safest to assume the visor is a new or 80s-inspired reproduction. Buy mainly for the style and build quality you can verify in the photos and description, and treat the “vintage” label as a visual cue rather than a guarantee of age.
How can custom text or logos still fit an authentic 80s visor aesthetic?
Custom designs look most 80s when they stay bold and simple. Think solid block or varsity-style fonts, all caps or short words, and clear shapes rather than intricate scripts or ultra-thin minimalist lettering. Neon or strong primary colors work well—hot pink, electric blue, bright red, yellow, lime—especially against white or dark bands. Place text where 80s visors usually carried logos: across the front band, centered on a foam panel, or along a side panel, rather than scattered in multiple small areas. On DHgate, I’d keep custom designs minimal and ask for or review any mockup the seller offers so you can confirm the font, color, and placement feel in line with the 80s look before confirming the order.
What should I do if the visor I receive from DHgate is materially different from the listing?
If the visor arrives noticeably different—such as a much duller or different color, a changed logo treatment, or flimsier materials than shown—start by documenting the differences with clear photos from multiple angles. Compare the item directly to the listing description and images, noting specific mismatches like color name vs. actual tone, promised logo vs. printed design, or visible thickness vs. what you received. Contact the seller through DHgate messaging, explain the issue politely, and attach your photos and a short summary referencing the original listing. If you can’t reach a fair solution, open a dispute or refund request through DHgate within the platform’s stated time limits, submitting your evidence so DHgate can review the case. I’d favor sellers who respond promptly, offer transparent information, and propose reasonable fixes; slow or unclear communication is a sign to rely more on the formal dispute route.